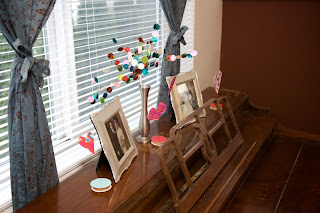
I love decorating.There is something about a little change to a room that just feels good sometimes--adding color, adding personality, adding a reason to smile. :) Cali must have been in the same groove I have been in lately because I have been working on this little project to share...
I also love reusing things that ordinarily would have been tossed away without much thought--there is something uniquely satisfying about a re-purposed craft. So...here is one of my own creations to enjoy during your routine blog browsing. And if you like it...maybe you can find the time to do it for your own home.
Materials Used:
Valentine patterned paper (from the $1 section at Target)
metal wire (the thicker the better)
empty cardboard ribbon spools (I had been saving these for months, I knew I would find a good use for them!)
hot glue gun
scissors
a bit of ribbon
Start by tracing your ribbon spools on the patterned paper and cutting out the circles to cover the them. These are going to become the bases to your little floating hearts. Then cut out various sized hearts from the patterned paper. You should end up with a nice collection like this one.
Before gluing the paper to the spools, make sure that there are holes in the middle--I had some larger spools with holes, and other smaller ones without. So I just used my sturdy kitchen scissors to poke hoels on both sides. This is to make it easier to insert the wire in a few minutes.
Next, glue the paper circles onto one side of the ribbon spool. You will cover the hole you just made, but your wire should poke through the paper without any difficulty.
The next step is the wire--you can leave it straight, or make it curly, but be sure you don't make it too long; the thickness of your wire and the size of your paper hearts will determine how tall they can be, you'll just have to play with it a bit and see what works. To make it curly, I used the glue sticks for my hot glue gun and just wrapped the wire around it. Regardless of what you choose, you will need to curl the end of your wire a few times around something--a pencil, a wooden spoon handle--to secure it to the base inside the cardboard ribbon spool.
Once it is curled, find the hole in your base and thread it through.
Then use the hole on the bottom of the base to insert a good squirt of hot glue. Hold the wire in place against the bottom until it has cooled and hardened. This should ensure a nice solid base.
If you chose to keep the wire straight, you can add just a small twist in the middle for fun! :)
Finally, attach the hearts to the top of the wire. I used two paper hearts on either side of the wire, but you could just do one and have the same end product.
What do you think?
I also made several with two hearts--I liked these better because I think it is easier to make the wire attach firmly in the base.
Just cut a slightly longer piece of wire, bend in the middle, and then fold your bent end at a ninety degree angle.
Then slide the wire into the hole and press against the bottom of the base, attaching with glue in the same way as before.
And here is what it looks like finished. Yay!
One more step that I still need to do...hence there are no pictures here...is to add ribbon! Yes, wrap a little ribbon around those spools where it was once before, and then your project is complete!
You can now add a little love around your picture frames...
On your mantel...
Or anywhere else where you want people to "feel the love."
This could be done with so many other things--four leaf clovers for St. Patrick's day--little bunnies and duckies for Easer--stars for the Fourth of July--just save up those ribbon spools until you have enough to decorate!


Those are DARLING!!! Thanks for the tutorial. Love them!
ReplyDelete