Showing posts with label Tutorial. Show all posts

Wednesday, January 18, 2012

Sugar and Spice, and a Tutorial!

Well now, it has been a long time, hasn't it? After a long break from blogging, which was unintended but turned out to be totally needed by most of us, the Praiseworthy girls are back! We'll be here and there, somewhat less regularly than we used to - we have springtime to plan for and babies on the way! - but I think I can speak for all of us when I say we missed you. So here we go.

I always thought that the little rhyme about "sugar and spice and everything nice" was a teeny bit unfair to girls ("everything nice"? I mean, that's a pretty tall order, don't you think?). Until I had a little girl - who is smart and helpful and funny and pretty and independent, and sometimes a whole lot more spice than sugar!

Here she is at just 4 days old. Sassy already! ;)

Now, to be perfectly honest, I love spice. Ask anyone. We have a whole kitchen drawer dedicated to spices, and a box in the pantry for what doesn't fit in the drawer. There are two ingredients I never measure anymore: vanilla and cinnamon. And when I use either of those two lovely lovely things, especially the cinnamon, I cannot help but think about how fortunate I am. I think "here is this precious spice, a spice that whole countries once fought other whole countries over, and I have a big jar of it right here in my pantry, and it's abundantly available to me when I run out. And here I am, I don't even measure it, I just toss some in like it never cost anyone anything." I don't know, I just love that thought; I love how simple it is, and how good for the soul.

Anyway, back to my point. My daughter has made me appreciate that little rhyme, by making me think about the spice. And I do love spice!

I also love this little skirt, which was made for my little Miss Sassy C when she was two:

It's sushi fabric! And it's reversible! She would wear this with her little red rain boots or her blue shoes with the orange stars, and just radiate the cuteness!


I loved it so much that when she grew out of it, I did some careful examination of the seams and stitches, and made a couple more in bigger sizes (and fabric that suited her better at four- and five-years-old). They're still favorites of hers and mine.


And so! When our Cortney's littlest girl had her last birthday, I knew just what to make. And I took pictures! So now you can make some too!

For a size 3-ish skirt, you'll need:

Two pieces of fabric: 37" x 13" and 37" x 15"
Elastic, 1-inch wide


Sew each of your fabric pieces into a tube with the seam along the short end. Zigzag stitch the seam together, and do another zigzag stitch along one raw edge of each tube. Fold that edge up 2" on the 13" fabric; and fold up 3" on the 15" fabric. Stitch those folded up edges close to the raw edge. Like this:


Turn one of your tubes right-side out, and pair them up right-sides together. Match up along the raw edges at the top. Make sure your tube-seams are matched up, too. Like this:


Stitch all around the top:


When you open it up, it will look like this:


Now fold it along the seam you just made, with wrong-sides together. Press to flatten, like this:


Now make another seam, a smidgen more than an inch from that one at the top, leaving a space open to feed the elastic through. Like this:


If you look between the two pieces of fabric, your opening where you'll feed the elastic through will look like this:


Trim your elastic to size so that it fits your daughter's waist with a little stretch. Pin one end of the elastic to the fabric with a safety pin, and put a second safety pin on the other end of the elastic. Like this:


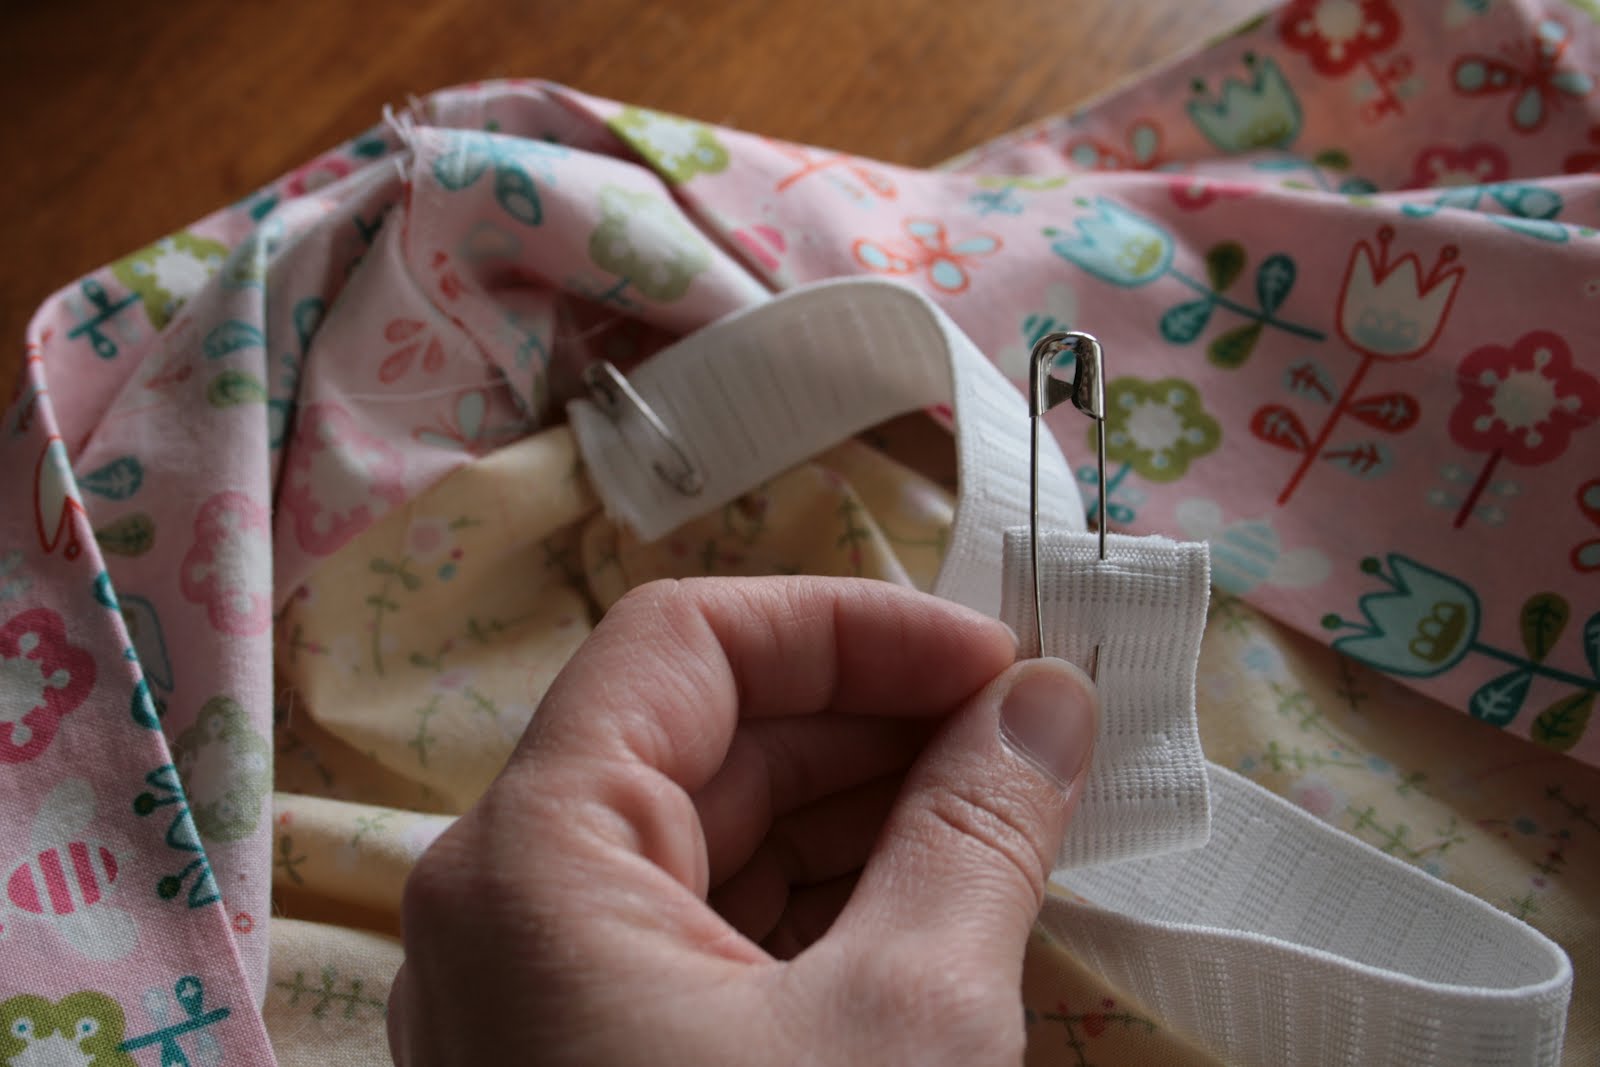
Using that safety pin on the end, work the elastic through the opening and all around the skirt, making sure the elastic doesn't get twisted. Hook the two safety pins together, then shimmy and pull the elastic around inside the seams so it's all nice and even.


Once you like how it looks, stitch the two ends of elastic together and trim off the excess:


Turn the skirt back to wrong-sides together and stitch up the opening - just pick up that seam you left, right where you left off. You're done!


So cute one way ...


... and the other!


Monday, March 28, 2011

Easy Fabric Flowers


I know there are tons of tutorials all over the Internet for these, but people keep asking to have a tutrial here, so I learned how to make some. THEY ARE SO EASY!! I was terrified, really, they look so hard, but I made one in ten minutes. Seriously. Easy Peasy! Supplies

Fabric Scissors, or a Rotary Cutter (I would have used a Rotary Cutter, but mine is missing)

Thread

A hand needle

A Ruler or something to use to measure


Cut your Fabric into 5 Squares. Any size will do. I made a few different sizes, but i really like the smaller ones I made with 2.5 inch squares


Thread your needle and make it long enough to fit five "petals" on, before they are cinched.

Fold your squares into a triangle. You can press them if you want, but I didn't and it worked fine.

Sew the open ends of your triangle loosely so that it can be gathered.


Thread them on, one by one until they are all attached. Cinch them together as tight as you want to form your flower.

Tie the ends together.

Add a button or another embellishment to cover the center.

Ta-da! A easy fabric flower!

With fabric flowers, there are endless possibilities!

Wendesday Wreath


Hello! This is actually Cali today, not Jenni. We swapped days this week, just so you are not confused.


Anyways, a few weeks ago I told you about a craft I had started, but not yet finished. I am actually going to break it up into two tutorials, since I can. So here is the Yarn Wreath. (You can Find the fabric flowers here.)


I have seen these all over recently so I decided to jump on the band wagon, and since I have had readers tell me that even though it is somewhere else on the Internet, they prefer to have the tutorial here, so here you go. That, and the tutorials I looked at did not tell me how much yarn to use, so you will get that here as well. Supplies

1 Small Wreath Form (I used the dollar store again.)

1 ball of yarn (I used about half of it give or take a little.)


That is it!

I started my wreath by overlapping some of the yarn as I wrapped it so it would stay in place.

I then tightly wrapped it around my wreath form.

It was really simple. A little time consuming, but I did not fell all that great that week, so it was nice to just sit on the couch with my rice bag and mindlessly wrap yarn around the form.

Anyone can do it.


This is what it looked like when it was covered. I just tied off the end. I am sure you can glue it if you want.

I wrapped a little bit of ribbon around it and added some fabric flowers. I just pinned them on so I can use the form for other holidays, or seasons.I am trying to figure out how to pin on a little Peep Bunny or Chick and not have it leave a mess.


So if you want another easy door decoration, here you go! There is just something about wreaths that make your house seem happy and welcoming. Enjoy!

Thursday, February 3, 2011

1 Hour or Less Valentine Wreath

Yeah, that is right, one hour or less, and it only cost about 3 dollars! Less if you recycle some old fabric scraps, an old towel, etc.
Here are the instructions. Sorry for the lack of pictures. I started taking them and missed cutting and pinning. Oops, but you'll get the idea. (I hope.)


Supplies
1 wreath form ($1 at the Dollar Store)
4-6 felt squares (4/$1.00 at Joannes)
Pins (I already had some, although some heart ones would be cute in this too)
scissors
small cup
ribbon
marker

Trace circles onto your felt.
One square gets you about 24 squares

Stack your felt about 3 thick and cut them out.

Pin them to your wreath. Pushing up the circles as you go along so it is not flat.

Tie a ribbon on.
Hang on your door, or where ever else you want to.

And there you have it, a $3.oo/ 1 hr wreath!

Enjoy!

Wednesday, October 13, 2010

Stuffed Yo-Yo Pumpkin Tutorial

We're guest posting this tutorial over at V and Co. today. I happened on her blog about a year ago, and coincidence of all coincidences, she lives in the same tiny little town as my mom and dad. I recognized the mountains and landscape in her photos before I even knew it was the same town. If you haven't visited her site, spend some time over there, and you'll feel like you have a new best friend. Thanks, Vanessa, for hosting us today!


So this is a continuation of my post last week, since I already professed my favoritism of pumpkins. For some background, a couple of years ago, I took a ferry ride with my sister and good friend to Bainbridge Island to do a little shopping around town and, by design, spent most of our time at Esther's. Seriously a jewel of a fabric shop with mostly quilting cotton but a surprising amount of wide-width fashion, exotic and home decor fabrics. And, they display quilts on. the. ceiling. I love that.
.
Anyhoo, I saw some cute little pumpkins scattered around the shop, and when I asked if there was a pattern, the woman working there said, "Easy! If you know how to make a yo-yo, you already know how to make a pumpkin!" The shop owner, Jennifer (don't you love her beautiful name?? :-) ), was gracious and enthusiastic about serving as the inspiration for this tutorial. If you're ever in the Seattle area, make it a point to take a scenic ferry ride to Esther's, and be prepared to be inspired yourself.

So, without further adieu, as promised, here's the tutorial for a super easy, cute pumpkin...it's addicting. "No one can [make] just one!"

Here are the supplies you'll need:


  • fabric of your choice
  • scissors
  • poly-fill stuffing
  • green floral wire
  • silk leaves (yes, I know mine are maple leaves, but with a stuffed pumpkin, I'm not exactly going for horticulture accuracy!)
  • glue gun
  • needle and thread
  • small tree branch picked up from your yard (not shown above)

1. Trace around a circular object. Keep in mind your finished pumpkin will be roughly 1/2 the size you are tracing. So, this 14" pizza pan I'm using yields a pumpkin 6-7" in diameter. Like my "helper?" Cut out your circle after you've traced it.

2. Sew around the edge of your yo-yo. Fold over approximately 1/4" to the wrong side of the fabric and sew a large running stitch all the way around. I used quilting thread because it's stronger and you'll be pulling it tight later. If you don't have quilting thread, just double your regular thread.
3. When you get all the way around, pull up on your thread to create kind of a bowl. Hold off on knotting your thread until you've stuffed the pumpkin.

4. Stuff it! Fill opening with fiber fill stuffing. It doesn't need to be stiff like you would stuff a pillow. Just fill it to your desired squishiness.


5. Tie it off. Pull up on your thread until there's just a small hole in the top. For a pumpkin this size, the hole was about 1". For smaller pumpkins it would obviously be a smaller hole. You don't want to completely close it up so you have room for the finishing touches.

6. Time for finishing and embellishing. Wrap your green floral wire around a pencil to make a curly pumpkin vine tendril. Leave a straight tail on the end to put into the hole in the top.


7. Using your hot glue gun, apply a generous amount of glue to the bottom inch or so of the tree branch. Poke it down through the hole and twist it a bit to make sure it's secure inside the stuffing. Snip off a couple of silk leaves, leaving some of the stem on the bottom. Apply glue the same way as before and place them right around the stem so they'll cover up the hole and batting. Glue the straight tail end of the green tendril the same way as the branch, and tie a ribbon or fabric strip around the stem for a final decorative touch.


Have fun making tons of these little cuties in any and all sizes!

Monday, May 17, 2010

To Be a Girl and To Have a Girl

If you have a girl or if you love being a girl then your hair probably plays a pretty big role in your life.  It somehow is the one thing that can make us feel pretty or make us feel well...less then pretty.  The time that can be spent on it is endless and the fact that it needs to be done everyday can be daunting sometimes.  So let's see if we can spice it up this week!  Throw in a flower or a headband or even a scarf and see if it brightens your outlook on your day.  I am not much of an accessory girl myself but I think, in honor of hair week here on Praiseworthy, I might try to add something fun and see if I change my mind.  Why not right? 

Will you do it with me?
 
Oh,and  let's doll up our little girls too. They're not going to let us do this forever so let's be sure to do it now.  Because my little munchkin doesn't have a whole lot of these luscious locks on her sweet little head I tend to make sure people know that she is a girl by adding something everyday.  Here are a few tutorials I love.  Make something special for you or your bug this week and see how easy and fun it is.  It's spring...the perfect time to let your style bloom.