Wednesday, March 31, 2010

Parties - they're not just about the food...well, maybe a little

Has anyone else gone through this whole day thinking it wasTuesday? No? I'm the only one? OK never mind. Here's my tardy post this week.

Party planning...hmmm. Who doesn't love a good party? When I was a single girl, my roommates and I reveled in having our little apartment alive with fun and festivities. One roomie in particular, Debbie, and I were the perfect team. I was the mostly in the kitchen who thought up and executed the goodies, and she was the entertainment. We got so good at it that we were able to throw together impromptu get-togethers with ease, and those were often the best ones.

Nowadays, it's a little trickier to plan parties, so whatever I can do to make it easier on myself, well, that's what I try and do. Here's a fun read that I own with some valuable tips in this book, and it's one of my favorites:

Her tastes are definitely more refined than mine (I've never baked a rack of lamb or made any kind of pate'), but this presidential-budget-writer-for-nuclear-programs / turned / caterer / turned / cookbook-author-and-TV-personality makes me dream of perfectly successful parties with minimal effort. She's a smart cookie, imparting party wisdom based on past successes and not-so-successes. In the book she intermingles menues and coordinating recipes with tips. Here are a few:
  • Stay cool. Don't let the guests know you're stressed or that you've been slaving or obsessing over the food all day. "Otherwise, they feel bad that you have worked so hard, and the party is off to a rocky start." We're glad they've come, so act like it.

  • Assemble food. Instead of toiling for hours or even days before the party, it's OK to purchase food and assemble it the day of, and you'll be a more relaxed and pleasant host because of it.

  • Cook together. Your guests can be your sous chefs, so give them a nice cold beverage and put them to work! It's more fun that way when everyone is involved. This is a fun idea for a pizza party.

Recently, our baby girl turned ONE and it was probably the least stressful birthday party I've put together. The theme was around "spring chicken" since that's what she is! It was later in the afternoon, so it was lunch time but before dinner. I used my Stoneware I've collected over the years, which is a silver/pewter composite that is molded into bowls and plates. This tied together the presentation of the food. The tablecloth is more summery, but it's so cheery, I just couldn't NOT use it.

There were snacky things for both kids and adults, the centerpiece being my attempt at petit fours. They were more of a free-form glorified cupcake, but yummy just the same. I made these a day in advance and brushed the cake with just a little simple syrup to keep it from drying out.

And what did the guest of honor think of her first big she-bang?
...and that's all that really matters, right?
Party on!


Monday, March 29, 2010

Quilt-Along Week One: I Got Carried Away


How are your nine-patches coming along? As you can see, I got a little carried away. But these little squares are so darn easy! Plus, every little 2.5" square I stitch is another 2.5" of fabric that's not just sitting around in my stash, and I can't even tell you how happy that makes me!

The photo above is a layout of what the main part of the quilt (without borders and binding) will look like, with white squares in between the nine-patches. If you stop next week at 13 nine-patches, you'll have enough for a nice, respectable baby quilt.

You might be able to tell that I'm not too worried about matching whites here - if it's white-ish and cotton and I can cut it to the right size, I'm using it, from muslin all the way down to old thrifted sheets. I love how completely scrappy it is; to me, it feels worn-in and loved already.

Last week I mentioned that I like to make these blocks assembly-line style ... here's another glimpse of what I mean:


And finally, I just can't resist showing you a piece of one of my all-time favorite fabrics ever, this adorable little gnome (from Heather Ross's "Lightning Bugs" line)


Isn't he just the cutest?

How about you, are you using some of your old favorites for this project? If you take a photo and/or blog about it, do send a link along, I'd love to see what you're up to!


Guess I'm Your Party Man ... er, Woman

Okay, so first of all, as soon as I realized we were writing about parties and party planning this song started up in my head.


I've never seen this movie, so can't vouch for its praiseworthy-ness. But the song? Well, it's Peter Gabriel. Enough said, right?

Now that we have that out of the way, I should say I'm the laziest party planner ever. It didn't used to be this way. When I was in college, any excuse was a good excuse to get people together, and I would spend the weeks before thinking about it - how and who to invite, what decorations would go up and where, food, what to wear - oh, my goodness, what to wear! I've had successes (the masquerade party, where my ex-boyfriend came in drag and my future husband arrived as a giant red necktie ... that necktie still makes me smile, oh how I love that man!) and massive failures (but we're not here to discuss those, are we? ;)

These days, with two little ones in tow, things are both more complicated and a whole lot simpler. Complicated because it's not easy anymore to get a party together for just any old reason. Simpler because, well, I've made it that way.

I think one of my best investments since having kids has been a bunch of colorful picnic-type plastic plates and cups. I don't ever have to shop for paper plates and cups anymore, and it's easy clean-up to just toss them in the dishwasher.

The next best investment has been to make a bunch of bunting garlands. We use them at every birthday. They're quick and easy, and a great scrap-buster for when my fabric stash gets a little overwhelming.


Sometimes we'll have a theme for birthday parties, but I like to keep it simple and easy. We play the same old party games, but change the names and the props, for instance. We don't get too caught up in the details, which keeps it fun.

This was our summer-time backyard birthday party for my daughter's 4th. We loosely themed it on Alice in Wonderland. The castle was a TV box I transformed when she was 18 months, the canopy we bought at IKEA and usually hangs over her bed. The pom-poms in the trees were a rare Martha Stewart success.


I'm not sure you can get much simpler than sprinkles and printed-out toothpick tags.


This was one of my favorite ways ever of using up old scrapbook paper.


We used paper bowls attached to paper plates to make "mad hats". We let the kids go crazy with tissue paper and foam stickers. (That's my lovely sister modeling.)
We also played "Button Button, Who's Got the Button?" but we called it "Who Stole the Tarts?"


Again, easy peasy. Just wrap the candy bar in scrapbook paper and glue on a label.


For parties that aren't birthdays, we do the same sort of thing. We had a Halloween party last year with, again, basic party games (pin the tail on the black cat, etc.), cupcakes and the kids got to dress up. It was a blast.

White and orange frosting, a tube of black icing from the grocery store, and a free printable. (I'm sorry I can't remember who designed these, but I found them via One Pretty Thing - best site for crafty ideas ever!)


Some other fun ideas I happen to have photos of:

My sister made her daughter this really big rainbow cupcake for her birthday, using white cake and food coloring.


My daughter's friend's 5th birthday party featured these adorable kabobs. They were a big hit with the kids and the adults, and I'm told the birthday girl had a blast making them with her mom.


Sunday, March 28, 2010

Just Go For It!


I know for a lot of people party planning, especially for kids, can be stressful and crazy and sometimes expensive but it can also be pretty fun. I think the key to enjoying yourself is to simplify where necessary, make it great enough to remember and have fun being creative.

I really love to plan a good party...sometimes even more then enjoying the actual event.  I think it's fun to come up with a theme and with colors and doing it all in secret.  I get excited when I come across the perfect idea.  I will admit that sometimes I can take on too much in a super short amount of time.  I am the queen of thinking up a great idea one or two nights before and having to execute it under a time crunch.  I don't recommend that for most situations but I did have one party for my little man that seemed to go off perfectly under the circumstances.   I rallied my troops (which in this case were my cute friends) and we made it work.  

(I love how exciting the unwrapping of presents ritual is to these cuties).

The Age: The big deal 4
The Guests: 12 really cute rowdy buddies
The Theme: Lightning McQueen the Famous Race Car
The Place: Our house


Because I love the look of handmade things and I wanted to be able to use the decorations over and over again I completely ignored the easy quick premade "Cars" party decorations and made my way to the fabric store.  I bought all kinds of classic black white and red fabric and made a bunch of these fun birthday buntings . These are an easy project and are great for any holiday or birthday.  You don't have to throw it away at the end of the night and it will last you for forever.  I also bought some black and white checkered looking fabric for a table cloth and some to make some racing flags.  I had to work and sew quickly.  I still had 15 card board boxes to spray paint red and get all of the fun stations ready to go (face-painting/car detailing, ballon popping, speed racing, pinnate in the garage rigging) plus a cake endevor that I couldn't just not try...this part scared me the most.  Like I said...I was glad to have my friends there to help. I really couldn't have pulled it off without them.


The few days before were crazy and stressful and I'm sure I neglected my family a little but after a really long fun night with two of my favorite girls and buckets of red frosting we were ready to start Payton's engine. 
The kids arrived, we did everything we planned and the party was a success.  I had a very happy little boy and now we have some great memories of his 4th birthday.  


I think every crazy moment can be worth it if you make it enjoyable for yourself.  I would hope that every overly ambitious mommy has awesome friends like me and I believe that going all out can sometimes make you realize how much you can actually do.  That doesn't mean taking the easy road builds less character I'm just saying that going for it every once in a while can be eye opening and surprising! They are only going to be 4 once.  Plus you might discover you love it, like I did.  


Enjoy and I Hope You Get Inspired! 


Thursday, March 25, 2010

Stretch Your Brain

I recently attended a class where the teacher presented us with a puzzle. It was a square, evenly divided into sixteen smaller squares. He asked the question, "How many squares do you see?"


At first, the answer seems easy. But then with a little more time to look at it, and a little more thought, it becomes clear that there are more squares than you initially see.

What do you think? How many squares are there?

Here is another one for you. The five pieces below must be put together into a square.


It's deceiving because four of the five pieces are already in a square. How on earth can you squeeze the fifth piece in and keep it a square? It can be done... try it, and then click here for the answer. But do try it first!

If you enjoyed these puzzles, here is a link to try one more I found...

What is the point to all these silly square puzzles? Well, normally I wouldn't spend my free-time on things like this because I wouldn't have qualified it as productive. However, lately life has reminded me to look a little closer, think a little longer, and try things in a way that may not have been apparent at first. And besides, it feels good to solve problems that are not related to housework and child discipline every once in a while! At least these puzzles have definite answers...

What do you do to stretch your brain once in a while?


ps. The answer to the first puzzle is 30. Can you see them all?

My First

This past Christmas, instead of giving store bought gifts, all us here at Praiseworthy decided to do a quilt block exchange. I was pretty nervous. I had never made a quilt square before. The only quilt I have ever made was a fray quilt. It was simple. I had always wanted to learn to make a quilt and making a square was the starting point. It was actually pretty easy. I know how to cut and I know how to sew a strait line, and that is pretty much all the skill you need when making a quilt block. I think the best thing about this was we all are at different levels as far as sewing is concerned. So here are pictures of our creations. Something to get you inspired I hope. Jen's
She seriously has some mad quilting talent.
Rachel's
Seriously, she is good!

Jenni's
She has an awesome fabric variety. And look at that mermaid!

Cortney's
The circle one has raw edges on the circle so it will frey when washed, and the other on is super cute with lace and ric-rac.

Mine
Easy, a little skewed, but still my first ones ever.
I love them and all the imperfections that came with them.
I think that is what is great about quilt blocks. They are not all perfect, but it is the imperfections that show the love in making it. Now if only I can muster up the courage to sew them together to make a quilt top, let alone the courage to quilt it. Wish me luck!

Oh, and check out Rachel's 9 Square it looks easy. You can even join the Quilt-Along!


Wednesday, March 24, 2010

A Square Meal


As far back as I can remember, I've enjoyed cooking. And Mom did well to teach me how to put a meal together so that everything is done at once - main dish, side(s), salad, etc. These days with two little ones, I'm practically Frisbee-tossing food onto the table in time for us to all sit down and shovel it in our mouths before bath and bed time. I still love to cook, but lately my challenge has been to make sure we're eating a square meal. I'm bored with the same old go-to green salad with tomatoes and cucumbers or plain jello with Cool Whip.
I know I can do more, and I want to do more. During my days of scheduled naps, reading the same library books over and over, and general predictability, I'm itching to throw in a bit of the unexpected, and dinner time is a venue to do it. So, I'm getting out my cookbooks and recipes to spice up my side dishes. Here are a couple of our favorites that we ALL like, and I hope you'll try them too.


Creamed Green Cabbage

1 small head green cabbage
3 tablespoons unsalted butter
1/4 cup flour
2 cups warm milk
1/4 cup grated Parmesan or Romano cheese
1 tablespoon finely grated lemon zest

Preheat oven to 350 degrees. Bring 1 inch salted water to a boil in a large pot. Add cabbage. Cover and steam, stirring occasionally, until tender, about 5 minutes. Drain, and let cool slightly. Squeeze out excess water using a kitchen towel. Melt butter in a medium saucepan over medium heat. Stir in flour and cook until bubbling but not browning, 1 to 2 minutes. Slowly whisk in milk. Cook, stirring, until sauce is thick enough to coat the back of a spoon, about 2 minutes. Remove from eat; add cheese and lemon zest. Immediately fold cabbage into sauce. Season with salt and pepper. Spoon mixture into a shallow casserole dish. Sprinkle with additional Parmesan cheese. Bake until bubbling, 30-35 minutes. Let stand for 5 minutes before serving.


Marinated Carrots

Combine in deep casserole dish:
5 cups cooked (crisp-tender) sliced carrots
1 medium onion, diced
1 green pepper, diced

Combine in medium saucepan and heat until just warm:
1 can condensed tomato soup
1/2 cup vegetable oil
1/2 cup sugar
3/4 cup vinegar (any kind, but I like apple cider vinegar)
1 tsp. salt
1 tsp. prepared mustard
pepper to taste

Combine vegetables with sauce and marinate overnight. Heat in oven until warm through.


I'd love some ideas from you on how you shake up your Tuesday night chicken or Saturday's pizza!


Nine Patch Tutorial and The First Block


It's Day One!

I made my first block for the quilt-along this morning, so I thought I'd take some photos as I went along for anyone who's never made a nine-patch before. And then I realized my CF card was full, so I only ended up with a few photos! So, just for you, I did another one. Don't worry, I didn't mind. And it's really easy, here I'll show you!

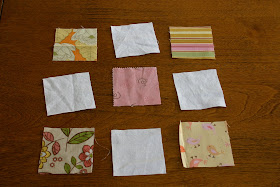
A nine-patch is just a quilt square made up of nine other squares. For our pattern, we'll start with nine 2 1/2" squares; 5 colored ones and 4 white. Like this:


Grab 3 of each and stitch them together, one colored and one white, using a 1/4" seam. When I do this, I do it assembly-line style. Stitch one pair and leave it on the machine. With a little space in between, go ahead and do the next one. Break the threads in between your pairs when you're done with all of them:

Don't mind the Curious George band-aid;
it's the first one I grabbed, I'm sure you understand :)


At this point, you should have three pairs together, and three lone squares, like this:


Next, stitch two colored squares to the white ones, and one white to the colored. Then press your seams toward the colored squares, like this:


Stitch those together and press (I just press the seams outward - not open), and you're done!


Don't worry about threads or anything just yet, unless you want to. You can also trim your block to make sure it's exactly 6 1/2" square, but I never do 'cause I'm lazy like that.


Tuesday, March 23, 2010

It's Hip to Be Square: A Praiseworthy Quilt-Along

Fabric scraps. They're becoming a way of life for me, in my quest to buy only the minimum yardage required to complete a project. To simplify and spend less. To use what I have before I acquire more.


It was almost exactly a year ago when I saw this quilt in a book at my in-laws' house and decided that was the quilt I wanted to make for each of my children with clothing they have outgrown. Someday. For now, though, it seems like an excellent way to use up all these little bitty scraps I have in my stash, but can't bear to throw away because that fabric was so beautiful.


Last summer, I did this quilt in a Crazy Mom Quilts quilt-along, and it was so much fun. And a challenge to keep up with the one-a-day pacing, but it kept me going when I didn't think I wanted to keep it up. I did end up quitting earlier than she did, but I love the results; seriously, I think this has become one of my favorite quilts. So many fabrics, so many other things I've made with them, so very many memories. We use it all the time.

So what do you say? Want to quilt with me? How about a Praiseworthy quilt-along to get us going, working together, and busting those scraps? For now I'm just cutting 2 1/2" squares. A lot of them. The official start-day of the quilt-along will be tomorrow, and we'll do one nine-patch square per day (or seven per week, or however you want to break it down). We'll stop when we have enough for a decent sized quilt.

Let me know if you're on board! And if you have questions, of course. I'll keep updating as I go, and then see you again on the flip side!


Monday, March 22, 2010

Timeless Treasures

At Christmas time last year I was visiting my parent's house and my mom had been doing some deep cleaning and going through some stuff to see what she could get rid of or give away.  I just happened to be there at the perfect moment to inquire about this incredible little treasure.  As we went through each bit of lace and every piece of history in this small basket my mind began to race with ideas of how to make these beautiful heirlooms useful again.  I begged my mom for some of it and with the promise to actually do what I was thinking I took this precious bundle home to Washington to meet my sewing machine. 

After a few months in the sewing closet I pulled it out today to examine it once again.  I had a SQUARE pillow form just begging for a makeover so I began.

First I found an old beautiful napkin, made out of this delicate gauze, and trimmed off the lacy edge (which was falling apart).  I then basted this onto a piece of creamy muslin just to keep it from ripping or distorting.  Then I found these beauties.  They were all connected, so I trimmed a bunch off and clustered them in this corner.   I made an envelope back out of the same muslin and Wala!  My fist creation from my treasure box.


Now I have bit of my Gammie Hill sitting on my favorite chair and when I teach my violin lessons I'll feel her right next to me...keeping me sweet and helping me become timeless. I definitely like that.  I can't wait to make something else.


What's your favorite treasure?